|
SEGA Saturn
3d Racing Game Project
Atlas
Atlas Creator
Atlas Game Packs
Benchmark RAM
Emulators
Mine Sweeper
Patching: Enemy Zero
Patching: PlanetWeb
RB library
Rockin'-VR
Saturn Game Tutorial
Save Game eXchange
Save Game Manager
Saturn High Level Interpreter
Saturn Tools
SCU indirect DMA
SGL replacement
Sound Player
Terrain Renderer
Texture Coordinates
The Rockin'-B All Stars
Tic Tac Toe
WinterSports Eins
Game Park 32
Mac OS X
SEGA VMU
Windows
|
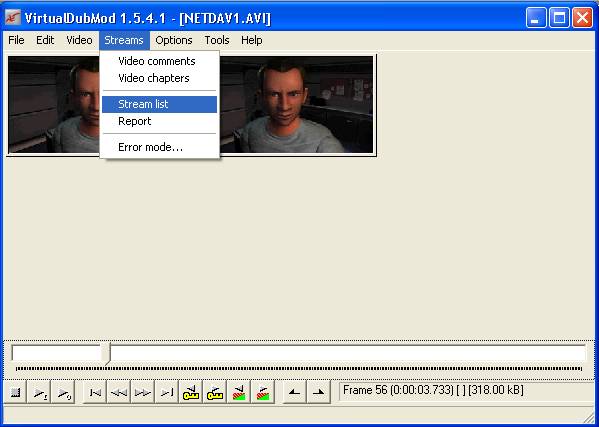
Patching: Enemy ZeroVoice language modding guide for SEGA Saturn version. the gameEnemy Zero is a thrilling horror adventure game for SEGA Saturn and PC, consiting of 3D first person shooter parts as well as interactive CGI rendered full motion video parts. The original Saturn version came with english (outside japan) and japanese (japan) voice samples. Later the PC version featured several improvements, one of which is two more voice sample languages: german and french (at least my PC version of E0). Well, german does not sound half as professional as the original english voice samples, but hey you could also re-record it on your own ;) . This page will guide you to replace your E0 for Saturn audio and video files with different language files from the E0 for PC. It's easy and applies to updating files of Saturn game CD's in general. For copyright reasons, I can't provide the game files here. What you need:Enemy Zero for SEGA Saturn - This Saturn game will be patched. No matter if japanese, american or european version. Enemy Zero for PC - Contains the new voice samples. Alternatively, you can write a translation on you own and let your sexy girlfriend do the voice samples in your language of choice ;) . a PC with CD burner - Need to burn the patched E0 on CD-R. a hex editor - Like WinHEX (Windows). a comprehensive CD ripping tool - Like IsoBuster (Windows). an ISO creation tool - Like mkisofs.exe (needs cygwin.dll) (Windows, *nix). a CD burning software (CUE sheet compatible) - Like Nero, CDRWin, ... a sound file format converter (.wav -> .aif) - Like Sound Studio (MacOS X). a video editing utility - Like VirtualDubMod. learn the swap-trick or install a modchip into your Saturn - Burned CD-R need special treatment to work on real Saturn. You can play it on a Saturn emulator, too. The Guide:(Repeat steps 4-7 for each E0 CD. Of course you only need to create "MAKEISO.BAT" and "E0.CUE" once) 1. Create a work folder "E0" on your harddrive. 2. The new voice samples: You need to change sound file format and filename of the voice samples of E0 for PC (I used Sound Studio, MacOS X): 2.1. Create subfolder "VOICE" in "E0". 2.2. Get the voice samples: In folder "EZERO" from CD0 of E0 for PC, you'll find files "?AN01.WAV" "?END3MIN.WAV" "?KIM1.WAV" "?KIM2.WAV" "?VOICE01.WAV" ..... "?VOICE22.WAV" The letter '?' marks the languag: 'G' for german, 'F' for french and '' (ignore '?') for original english. Select your language of choice and copy these 26 files to "VOICE" subfolder. 2.3. Convert them: For all 26 voice samplesfiles: 2.3.1. open the .wav file in your sound file format converter 2.3.2. select "save as" 2.3.3. in the file dialog, select .AIF format and correct the file name: 2.3.3.1. remove the first filename character (G - german, F - french, nothing to be done for english) 2.3.3.2. remove the leading '0' in files "?VOICE0??.WAV" 2.3.3.3. ensure that ".wav" is now ".aif" 2.3.4. select okay to save in "VOICE" subfolder 3. The multi-language videos: Some videos in E0 for PC have been updated to contain audio for all 3 languages. You need to remove 2 of them, leaving the disired language. For doing this, you need VirtualDubMod, the normal VirtualDub can't do this. VirtualDubMod allows to collect jobs and process them in a batch later. So I saved my joblist, you can use it if you want. Before doing, you'll need to change it's source CD drive and target directory with a text editor. As the video files are on 3 different CD's, you'll need to swap CD's. 3.1. In folder "E0", create subfolder "VIDEO". 3.2. Open VirtualDubMod. This is a complete list of all video files you need to process. You might find additional video files which have been updated, too, but they don't feature different languages. Instead they got a bigger datarate. 3.2.1. CD 1: "NETDAV1.AVI" "NETDAV2.AVI" "NETDAVD.AVI" "NETPAL1.AVI" "NETRON1.AVI" "R12M03.AVI" "R12M40.AVI" "R12M76.AVI" "R12M77.AVI" "R12M78.AVI" "RONNY00.AVI" "RONNY01.AVI" "RONNY02.AVI" "RONNY03.AVI" "RONNY04.AVI" "RONNY05.AVI" "RONNY06.AVI" "RONNY07.AVI" "RONNY08.AVI" "RONNY09.AVI" "RONNY10.AVI" "RONNY11.AVI" "RONNY12.AVI" "RONNY13.AVI" "RONNY14.AVI" "RONNY15.AVI" 3.2.2. CD2: "GOBRIDGE.AVI" "R13M01.AVI" "R13M02.AVI" "R13M58.AVI" "R13M84.AVI" "R13M86.AVI" "R14M02.AVI" "R14M04.AVI" "R15M15.AVI" "R16M48.AVI" 3.2.3. CD3: "DOC.AVI" "END.AVI" "ESTAFF.AVI" "VPSLOW.AVI" 3.3. Open the video file. Ensure that video processing is "direct stream copy". 3.4. Open the Stream List window:
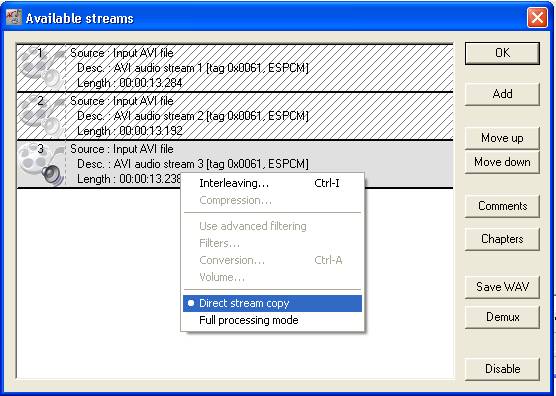
3.5. You'll see 3 audio streams. The top one is english, the middle one french and the bottom one is german. Activate your language of choice (the speaker is highlighted) and disable the other languages (shown striked). Ensure that "Direct stream copy" is selected for your language.
3.6. Save the file using the same filename into "VIDEO". This should be very fast, since you selected "Direct stream copy" for both, video and audio. Note, you can also add it to the job list, as I did. 3.7. Go to 3. until all videos are converted. 4. Rip data from E0 for Saturn (CD0, ... , CD3): You need to rip three different kinds of data (I used IsoBuster, Windows). 4.1. Open the E0 for Saturn CD in IsoBuster. 4.2. Rip the IP.BIN: 4.2.1. Right-click on the session and select "extract from-to". Select start LBA = 0 and end LBA = 29. Save as IP.TAO. 4.2.2. Take a hex editor, open IP.TAO remove all bytes beyond the IP.BIN. The IP.BIN is located at the start of IP.TAO, you can see where it ends there starts a big block of zero bytes. In my case (european E0), the zero bytes start at hex offset 0x12B0. Once you found the offset, mark all bytes after that offset and delete/remove them. Save the file as IP.BIN. 4.3. Rip the data: Right-click on the data track (first track) and select "extract". Choose "E0" folder to put the files in. All files will be placed in a subfolder called "ENEMYZERO", which is created by IsoBuster.. 4.4. Rip the audio: Right-click on the audio track (second track) and select "extract as .wav". Choose "E0" folder to put it in. 5. Patch ripped data (CD0, ... , CD3): Compare the content of folder "ENEMYZERO" with the new files in folders "VOICE" and "VIDEO". Note that each CD0, ..., CD3 contains a different subset of the available files. Copy that subset from the new files and paste it into "ENEMYZERO", replacing existing files. You'll need the "VOICE" and "VIDEO" folders to patch other E0 CD's later. 6. Burn patched CD (CD0, ... , CD3): You should now have a "E0" folder with (at least) that content: "ENEMYZERO" subfolder, "IP.BIN" and "Track 2.wav". 6.1. Create ISO: Download and extract Mkisofs.exe.zip and Cygwin1.dll.zip. Add mkisofs.exe and cygwin1.dll into "E0" folder. With a text editor create a file "MAKEISO.BAT" with that content: mkisofs -quiet -sysid "SEGA SEGASATURN" -volid "ENEMYZERO" -volset "ENEMYZERO" -publisher "WARP INC." -preparer "WARP INC." -appid "" -abstract "E0ABS.TXT" -copyright "E0CPY.TXT" -biblio "E0BIB.TXT" -generic-boot IP.bin -full-iso9660-filenames -o E0.iso ENEMYZERO The parameters are the same as on the original CD, I got them from IP.TAO using a hex editor. Make sure the file got the correct ending ".bat" and not ".txt". Windows XP sometimes hides the last file ending which can make you think it's a batch file although it's a text file. Finally double-click "MAKEISO.BAT" and wait until "E0.ISO" has been successfully created. 6.2. Burn ISO: Create a text file called "E0.CUE" with that content: FILE "E0.ISO" BINARY TRACK 01 MODE1/2048 INDEX 01 00:00:00 POSTGAP 00:02:00 FILE "Track 02.wav" WAVE TRACK 02 AUDIO PREGAP 00:02:00 INDEX 01 00:00:00 Save it to the "E0" folder where "E0.ISO" and "Track 2.wav" are. Use a CD burning program to burn the CUE sheet on CD-R. BURN SLOW (4x write speed), otherwise the videos may get stuck while playing. 7. Clean up: The patched E0 CD is burned, now you can clean up for patching the next E0 CD. Remove all files and folders, except "VOICE" and "VIDEO" folders, "MAKEISO.BAT" and "E0.CUE". |