Saturn
Game Tutorial
with complete SEGA Saturn demo
version 05/07/01
Downloads:
Saturn Game Tutorial (html + images) +
Saturn demo (for SaturnOrbit, C source, bin, iso, all GFX and SFX,
conversion scripts, NO CD AUDIO TRACKS) +
sprite & animation preprocessing script for The GIMP 2
SaturnGameTutorial_050701.rar
mp3 music for the Saturn demo (seperate CD AUDIO TRACKS
which are not included above)
SaturnGameTutorial_music.rar
Online:
http://www.rockin-b.de/saturn/saturngametutorial/SaturnGameTutorial.htm
Introduction
Introduction to the SEGA Saturn video game
system
About the Saturn Game Tutorial Demo
Introduction
Welcome to The Rockin'-B's Saturn Game Tutorial.
This tutorial will show you all basic techniques used to create a game
for the SEGA Saturn video game system.
With this tutorial comes a complete Saturn demo that - hopefully - is
easy to comprehend, well structured, reusable and which employs all
basic stuff a game would need. It can be build and used with SaturnOrbit,
the Saturn dev environment for Windows.
Also included is a script for The GIMP (free image
manipulation program) which is very usefull for sprite and animation
preprocessing.
Topics covered are:
sprites, 2 ways for animated sprites, bitmapped backgrounds, PCM
soundeffects, CD audio background music, textured polygons, realtime
gouraud shading, controller input handling, drawing text, CD file
access
as well as convertion of data types used and usage of compressed image
files.
Out of the mass of possibilities, the stuff that's shown here is very
well chosen.
Common pitfalls are clearely marked out as well as advanced and expert
techniques which you can skip when reading the first time.
You will find some stuff in the tutorial and it's Saturn demo code
which are new in Saturn homebrew and can't be found elsewhere.
The tutorial is presented like a FAQ. Though the order of topics is the
order to read for newcomers, you don't have to read all, but only the
stuff which is important for you.
Except this introduction, the author is trying to be short on words
;-). Well, I tried at least....
Feedback, additions, requests, bugs & corrections:
please e-mail
Introduction
to
the SEGA Saturn video game system
First off, programming SEGA Saturn is not difficult.
The hardware definitely is complex (and also very unique and
interesting), but if you don't want to go deep inside, everything is
just simple and easy.
The SEGA Saturn hardware consists of two main CPUs, the master and
slave SuperH 2 (SH2) RISC processor from Hitachi with each running at
28 MHz (25 mips), which can access 2 MB work RAM: 1 MB of fast DRAM and
another 1MB of slower SDRAM.
There are 2 graphic processing units: VDP1 for sprites and polygons and
VDP2 for scrolls.
An additional DSP usefull for geometry is part of the System Control
Unit (SCU). This DSP is not used by the SGL (free for you), only the
SBL libs MTH and SPR use it.
A difference between Saturn background image scrolls on one hand and
Saturn sprites and SDL blitting on the other hand is, that once set up,
you don't have to explicitly redraw Saturn backgrounds, whereas you
have to redraw Saturn sprites and SDL surfaces every frame.
About the
Saturn Game Tutorial Demo
The Saturn demo that comes with this tutorial shows enough features to
start a game from.
Features:
- background bitmap image with DHUFF compression is loaded from CD
- sprite/ texture table can be loaded from CD (with optional RLE
compression) or hardcoded in binary executable
- textured polygons (Saturn planet: 256, Saturn rings: 32)
- realtime gouraud shading (Saturn planet only)
- depth cueing
- full featured CD audio playback, audio tracks included
- PCM playback (2 small hardcoded, 1 large loaded from CD)
- short sprite animation of images in sprite table
- long sprite animation loaded compressed from CD
- multitap compatible
- multiregion
- exit to multiplayer or demo demo loader by pressing START+A+B+C
Controls:
Holding down one of the A/B/C/X/Y/Z triggers activates a certain input
mode.
For each mode, the D-PAD, START button and L/R triggers have special
meanings, which is displayed on screen by the text HUD.
modes:
A - sprite x/y position + sprite change
B - sprite zoom/rotate + sprite change
C - polygon x/y/z position, toggle realtime gouraud
X - PCM player, 3 sounds
Y - CD audio player, play, pause, stop, fast forward/backward,
next/previous track
Z - polygon x/y/z rotate, toggle realtime gouraud
Programs used:
SaturnOrbit
- Saturn development environment
3DEditor - Saturn polygon and texture tool
DXF2SG3.EXE, 3Dto3D.EXE, RB_SaturnDXF.EXE - 3D fileformat converter
BGCON - almighty saturn background converter
CMPRUN.EXE - RLE compression compatible with SBL's CMP library
SegaCueMaker.EXE - CUE sheet creation
The GIMP 2 - GIMP
image manipulation program
ACDSee - image
slideshow and batch processing program
Blender - 3D
modelling tool
NERO - CUE sheet
burning
How to set up (the dev
environment) SaturnOrbit
SaturnOrbit
is a ready-to-go and complete Saturn development
environment for Windows XP and Windows 9x operating systems.
The Saturn demo of this tutorial has been made with it.
Installation is easy, these are just some notes:
1. Download SaturnOrbit
(55.6 MB)
2. Install it by double-clicking the file. It requires 250-400 MB of
free space on hard drive C and will (must) be installed in
C:/SaturnOrbit/. Select the components to install. You must at least
select one of the two supplied compiler toolchains. Windows 9x users
must select the Win9x support, too.
3. After all files are installed you are asked to compile everything.
This is not neccessary, but it's recommended to run at least the COFF
compiling in order to test the installation and to build the libraries.
You can do it later, too, by running BUILDCOF.BAT and BUILDELF.BAT.
This takes a while and increases the consumed disk space by 25%-50%.
How to
start a new project in SaturnOrbit
There are two ways to compile a project:
1) with Dev-Cpp
2) with batch files
The SaturnOrbit
readme says it's not recommended to start a new project
from within Dev-Cpp
(because it's incomplete template mechanism would need you to make
further modifications to the project options by yourself in order to
compile it),
instead you are recommended to start from a copy of an existing
example.
So here is how you start:
Extract the Saturn Game Tutorial Demo and
modify it's sourcode to your
needs!
It can be compiled with Dev-Cpp and with batch files as well. Both
compile methods are setup for using the COFF and ELF toolchain.
How
to create batch files which use tools from SaturnOrbit
How to set environment
variables like
SaturnOrbit
Want to call/execute a tool that's included in SaturnOrbit
from a batch
file without copying it to the current directory, or without specifying
it's full path, which can change?
Set all environment variables used by SaturnOrbit
by placing this at
the beginning of your batch file:
COFF compiler toolchain:
COPY C:\Saturn~1\SET_COF.BAT
.\TMP.BAT
CALL TMP.BAT
DEL TMP.BAT
ELF compiler toolchain:
COPY C:\Saturn~1\SET_ELF.BAT
.\TMP.BAT
CALL TMP.BAT
DEL TMP.BAT
How to
write a basic SGL Saturn program
The basic C code structure of a SGL program for SEGA Saturn:
#include <SGL.H>

#include <sddrvs.dat>


....


void ss_main()
{
slInitSystem(TV_320x240,
tex_SpriteTable, 1);
// init CD block and CD file system
init_CD();


// init sound and CD audio
init_Sound();


// init sprite GPU, upload textures
init_VDP1();
// init background GPU, upload images
init_VDP2();
while(1) {
Uint16 data = Smpc_Peripheral[0].data;
// check for game exit
if(((data & PER_DGT_TA) == 0) && ((data &
PER_DGT_TB)
== 0) && ((data & PER_DGT_TC) == 0) && ((data &
PER_DGT_ST) == 0))
break;
// do game, start sounds
pad_input();


// GFX output
draw_Text();
move_backgrounds();
draw_Sprites();
slSynch();
}
// return to demo demo loader
// or activate multiplayer
SYS_Exit(0);
}
How to do sprite and
animation preprocessing with The
GIMP script
The GIMP is a free
image manipulation program which can process a batch
of work by the use of scheme scripts.
With this tutorial comes the script SegaSaturn.scm, which supports the
creation of sprites and animations, the setting of a transparent color
(colorkey) and the use of images with alpha channel. You can join all
images (of the same size) of an animation together which enables you to
later store them compressed in one file on the Saturn game CD.
Note: some procedures of the script require The GIMP 2.
Installation:
put SegaSaturn.scm into your GIMP script folder, something like
C:\Programs\GIMP-2.0\share\gimp\2.0\scripts
How to execute a script
procedure?
A) right-click on the image to work on, then select
Script-Fu/SegaSaturn/procedure-of-your-choice
or
B) on The GIMP main window select
Xtns/Script-Fu/SegaSaturn/procedure-of-your-choice
Most procedures will open a window to ask for parameters.
Procedure description:
setTransColor
<Toolbox>/Xtns/Script-Fu/SegaSaturn/setTransColor
<Image>/Script-Fu/SegaSaturn/setTransColor
Puts a new layer of the specified color behind all other layers of the
image, such that all transparent pixels will have this color.
maxContrastAlpha
<Toolbox>/Xtns/Script-Fu/SegaSaturn/maxContrastAlpha
<Image>/Script-Fu/SegaSaturn/maxContrastAlpha
Saturn cannot display sprites with an alpha channel, so this prepares
images with alpha channel to get a transparent color. Basically
switches the transparent pixel scheme from alpha channel to colorkey.
After running the script, the alpha channel does only contain two
values: 0 or 255 (full opaque or full transparent).
sprs2lyr
<Toolbox>/Xtns/Script-Fu/SegaSaturn/sprs2lyr
Reads multiple image files specified by file name pattern and creates
one new image containing each of the images in a seperate layer.
Animations and movies are represented that way in The GIMP. You can
playback the animation by right-clicking on the generated image and
selecting Filter/Animation/play.
lyrs2img
<Toolbox>/Xtns/Script-Fu/SegaSaturn/lyrs2img
<Image>/Script-Fu/SegaSaturn/lyrs2img
Starting from an animation (e.g. an image with multiple layers, like
generated with
sprs2lyr) a new image is
created which contains only one
layer onto which all previous layers (frames of an animation) are
pasted, started from top to bottom. This image can then be converted to
raw Saturn format with BGCON.
How to
convert PCM sound effects
SEGA Saturn can play a maximum of 8 PCM channels simultaneously with
heighest quality being stereo, 16 bit resolution and 44100 Hz
samplerate.
(However, the Saturn Demo shows a max of 4 sounds of 8 bit, mono, 8000
kHz)
Conversion of PCM sound effects is done in 2 phases:
preprocessing and conversion to Saturn hardware format.
Preprocessing:
Starting with sound files of various formats (.wav, .mp3, .ogg, .wma)
and different specs (mono or stereo, 8 or 16 bit resolution, samplerate
of maybe 8000 Hz - 44100 Hz) you need to convert them to .wav files of
uncompressed PCM data with appropriate specs for number of channels,
resolution and samplerate.
Use a tool like CoolEdit 2000 for this.
Some special attention to the sound specs:
Q1: How many sound FX do you want to use in total?
Q2: How many (and which) sound FX can play simultaneously?
Q3: Which of them must be always available/playable?
Q4: Which are played not very often or are very long?
You see these questions focus on the memory space consumption of your
sound FX files.
You can only include few 100 kBytes of PCM data into your source code
(Q3) and the low work RAM memory can hold a maximum of 1 MByte of PCM
data (Q4) that must be loaded from CD.
Beyond memory consumption there is another reason to lower the quality
(mono instead of stereo, 8 instead of 16 bit resolution, 1/2 or 1/4 of
original samplerate) of sound effects (Q2):
The Saturn can play 8 PCM channels simultaneously, but in practice this
results in a lot lower count of sound FX played concurrently. Obviously
stereo takes 2 channels. But also 16 bit resolution and 44100 kHz
samplerate lower the number of available PCM channels.
So spend some time to find out the right settings to maximize sound
quality for your purpose.
Example:
mono, 8 bit resolution and 8000-11025 Hz samplerate
are acceptable for most sound FX and voice samples
Conversion:
Okay, having the sound FX as uncompressed (e.g. containing a chunk of
uncompressed PCM) .wav files, you can convert them to C source files
for inclusion in your Saturn binary, or to binary PCM files, which can
be loaded into low work RAM, for example.
The used tool is called RB_SaturnPCM.EXE (C:/SaturnOrbit/TOOLS/). It's
called from the commandline.
Example:
RB_SaturnPCM.EXE shot.wav c
-> produces shot.pcm and shot.c
RB_SaturnPCM.EXE shot.wav
-> produces shot.pcm
If you gotSaturnOrbit, you don't have to have RB_SaturnPCM.EXE in the
same
directory, instead open a console window with PATH preset to find
RB_SaturnPCM.EXE by double-clicking one of CONXCOF.BAT or CONXELF.BAT
(WinXP, for Win9x use CON_COF.BAT or CON_ELF.BAT, all found in
C:/SaturnOrbit/).
Best option is to write a batch file of commands. See
How to create batch files which use tools
from SaturnOrbit
How to
convert background CD audio
music
There is almost nothing to do.
In order to burn a Saturn CD with audio tracks using the CUE sheet
method (see How to burn a
CD with audio tracks),
you need the audio files to be in WAV or MP3 file format.
Most files should already be in that format, if not use the converter
of your choice.
The specs of CD audio are stereo, 16 bit resolution and 44100 Hz
samplerate.
How to
convert background images (+
compression)
In SGL you can setup a bitmap scroll of size 512x256, 512x512, 1024x256
or 1024x512. Images transfered to this scroll can be smaller or equal
to
the size of the bitmap scroll.
Preprocessing:
Use an image manipulation program like The GIMP to resize the image to
the screen resolution or whatever you need, but be sure it does not
exceed the size of the bitmap scroll ( 512x256, 512x512, 1024x256,
1024x512).
You may also want to convert it to paletted or RGB color mode.
Save it as .TGA file.
Conversion:
The almighty tool BGCON (C:/SaturnOrbit/TOOLS/BGCON/) is used to
convert the TGA image to Saturn hardware format. You can output the
image as binary or C source file. Compression is also possible, like
RLE, which is compatible to the SBL's CMP lib and it's compression
tools
and DHUFF, which is more efficient and must be decompressed with
BGCON's DeHuff.o lib.
BGCON can get it's commands from a text file:
BGCON.EXE TGA2DHUF.TXT
The command file looks like this:
(input: TGA image format, output: 15 bit color depth, bitmap, dhuff
compressed, all pixels not transparent, save as binary and as C source)
CD 15
IF TGA
IM BITMAP
CMP DHUFF
RGBHI
ON
TRANS -1
L lava.tga
OF BIN
S lava.bin
OF C
S lava.c lava
Pitfall:
To avoid all pixel being
transparent and not displayed, you should specify the transparent
color. I got none, so it worked with -1 for me.
RGBHI
ON
TRANS -1
See How to create batch files which use
tools
from SaturnOrbit
How
to convert sprites, textures and animations
These are preprocessing steps before How
to create a sprite/texture table.
(targets 15 bit RGB here, although paletted is possible)
Restrictions to meet are:
- maximum size (in SGL) for sprite/texture table in VDP1 VRAM is
0x70000 = 458752 bytes = 448 kBytes
- width must be multiple of 8
- minimum size is 8x1 pixel (width x height)
- maximum size (for 3DEditor) is 256x256 pixel (although VDP1
manual says 504x255, all width x height)
- file type .bmp or .jpg
This section uses procedures of the
supplied SegaSaturn.scm script for The GIMP 2 (see How to do sprite and
animation preprocessing with The
GIMP script).
Sprites & textures:
For all images do:
(using The GIMP,
for example)
- Set bitmap mode to RGB.
- Scale the image down if necessary (to meet R1, R3 and R4).
Scaling on PC is better than on Saturn, as you can use bicubic or
bilinear filtering while Saturn does only some sort of nearest neighbor
which also increases rendering time (but no homebrew ever reached a
limit).
- Resize it to have a width of multiple of 8 (to meet R2).
- Saturn doesn't support an alpha channel (alpha blending), instead
transparencies are made by the colorkey method (assigning special
colors as transparent). To smartly remove the alpha channel, use
procedure maxContrastAlpha.
- If the image got transparent pixels, you will have to assign a
special color to them. Do this with the procedure setTransColor. Use black (best option if
possible, avoids some work
later), blue, red, green or any other color that 3DEditor's "Texture
List" tool supports to choose on export.
- save as .bmp (recommended, no loss due to compression) or .jpg.
Use 8.3 character filename format.
Animations (short) in
VDP1 VRAM:
How it works on Saturn:
Change the sprite/texture id for a sprite to change it's animation
frame displayed.
Different sizes of the animation frames are allowed.
In addition to the steps 1-6 above, make sure that the filename is
choosen such that the alphabetical order of all images is equal to the
order of frames. Use 8.3 filenames.
Example:
sprani01.bmp
sprani02.bmp
.....
Animations (long) in
work RAM:
How it works on Saturn:
Overwrite the sprite/texture bitmap data in VDP1 VRAM with data stored
in work RAM.
All frames of the animation are assumed to have equal size.
This is special:
For each animation of this kind you will need a dummy frame entry in
the texture table where the bitmap data is transfered to.
Example:
You have 10 work RAM animations in
total. They got 5 different pixel sizes. For 2 sizes it can happen that
multiple (let's say a maximum is 3 and 2) animations are displayed at
once, which are supposed to be out of synch. Some other sizes are
displayed at once, too, but they are in synch, e.g. always show equal
frames.
->
You will need to have 5 dummy frames, one for each size. Plus
additional (2 and 1) dummy frames for each out of synch animation
instance that can be displayed at once.
- If your animation is already available as one image with each
frame on a seperate layer (like when opening .GIFs in The GIMP), skip
this. If instead all frames are stored as seperate images, make sure
their alphabetical order is equal to the frame order. Then use
procedure sprs2lyr to create one new image
with each frame on a seperate
layer.
- Now apply scaling (to meet R1, R3 and R4) and then resizing (to
meet R2), it will effect all frames/layers.
- Generate an empty dummy frame image of the same size as the
animation frames, save it as .bmp.
- Use procedure lyrs2img in The GIMP, it
will create a new image
with one layer only containing all frames.
- Use procedure setTransColor, see
step 4 of Sprites & textures
above.
- Save the image as .TGA
- Use BGCON to convert it to a compressed binary file. Command line:
(See How to create batch files which use
tools
from SaturnOrbit)
BGCON.EXE TGA2DHUF.TXT
with TGA2DHUF.TXT containing:
CD 15
IF TGA
IM BITMAP
CMP DHUFF
RGBHI ON
TRANS -1
OF BIN
L newbie.tga
S newbie.bin
Pitfall:
BGCON is meant to be used for
background scrolls. The method for transparent pixels differs between
scrolls (setting RBG flag to 0, the most significant bit of the pixel)
and sprites (transparent color code 0x0000, all other colors MUST HAVE
RGB FLAG SET TO 1). So you can NOT set the transparent color with BGCON
(but you need to specify RGBHI ON and TRANS -1,
to set the RGB flag to 1). Instead you would need to do one of this:
- A) On PC use a HEX editor and
replace all occurences of the transparent color (Saturn RGB format: MSB
is 1 plus 5 bits for each color) with the transparent color code.
Attention: only uncompressed binaries can be HEX edited. So you can't
use the good DHUFF compression. But you can use RLE compression by
using CMPRUN.EXE (C:/SaturnOrbit/SBL_601/SEGABIN/BIN/) on the HEX
edited binary file.
- B) On Saturn call
function
void set_colorkey(Uint16
*p, Uint32 n, Uint16 transColor, Uint8 correctBlack)
on the data before using
it. This is some CPU overhead, but it's only once and you can use DHUFF
for smallest file size.
Note for completeness:
To put all frames into one binary file there is another way, allowing
frames of different size, that is also used to create a binary sprite
table (see How to create a
sprite/texture
table
to be loaded from CD (+ compression)).
Instead of putting all frames into one image, you can load different
images into BGCON and append the output for each image to the binary
file. But that's not as good in compression as the method presented
here.
How to
convert 3D data
Conversion for short is:
- 3D modelling tool (like blender) creates geometry only
- export as .DXF (optional: partitioned
export, to easy material editing later)
- convert to DXF with 3DFACE entity only
(with
3Dto3D.EXE or RB_SaturnDXF.EXE, compatibility reasons)
- convert to SG3 (with DXF2SG3.EXE,
optional: scaling, position, rotation, quad creation, dual face, normal
invert)
- apply Saturn specific material properties,
create texture table
- export 3D model as .MDL (C source), export
texture table as .TXR (C source) or create binary texture table
1.
Any 3D modeling tool that can export DXF files can be used to create
the geometry data. I use blender.
Don't waste your time applying material properties at this point,
because all that will be lost after conversion.
Saturn specific material properties will be added later in 3DEditor
(C:/SaturnOrbit/TOOLS/SSSDK/).
There is no way to modify the geometry in 3DEditor. You would have to
apply geometry changes in the 3D modelling tool and do the conversion
again with all previous material settings lost. So be carefull.
Size, position and rotation can also be changed in a middle conversion
step later (by DXF2SG3.EXE).
You should also take in account that the hierarchy of the 3D model will
most likely be destroyed.
2.
All geometry finished, now prepare to export.
Although 3DEditor got some face select tools, it is sometimes faster
and easier to seperate the 3D model into few pieces of similar material
and export each to a seperate .DXF file.
(like I did with Saturn planet and rings on which I applied a sliced
texture later)
Pitfall:
All object transformations can be lost in following conversion steps.
So you have to apply all object transformations to all the points
instead.
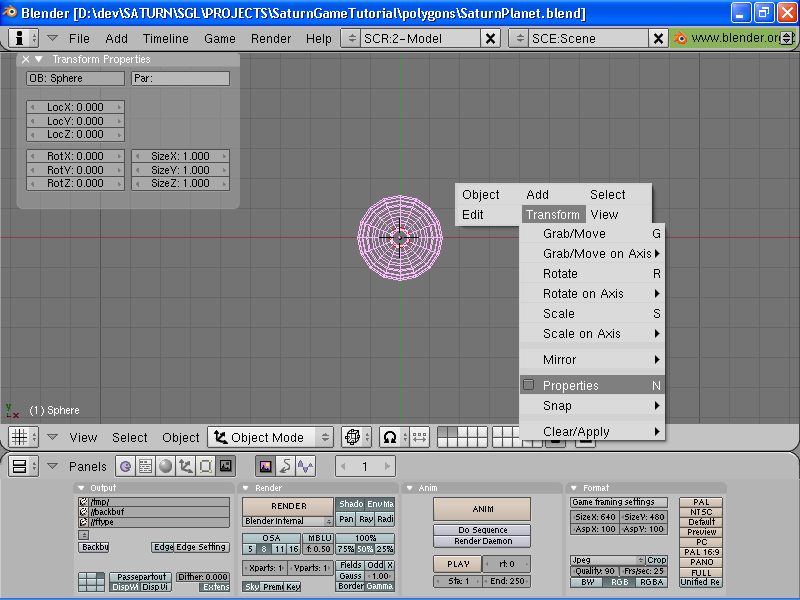
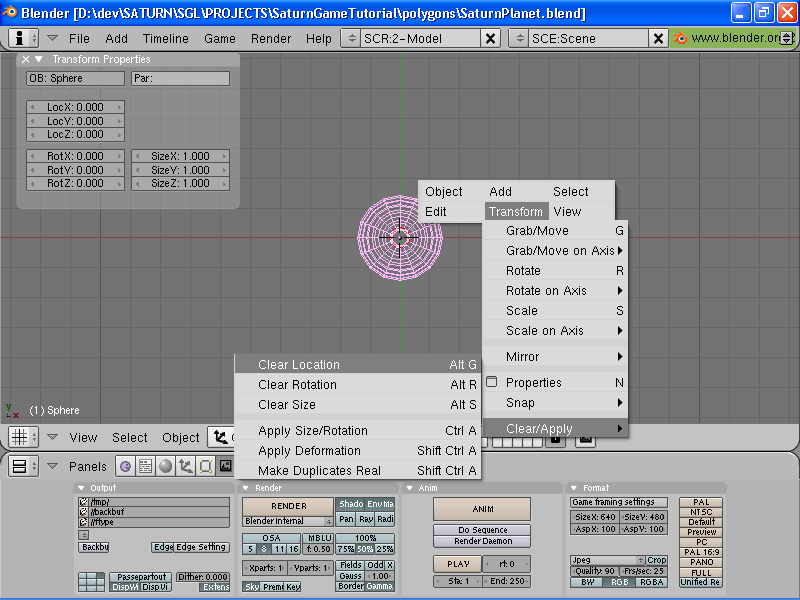
You can check if such object transformations are present:
(no translation, rotation or scaling in this image, so it's OK)
If there are object transformations, clear them and apply these to the
points instead.
Now export the objects as .DXF.
3.
Some newer geometry entity types of DXF are not supported by
DXF2SG3.EXE, but 3DFACE entity is.
There are two tools to use for this task:
3Dto3D.EXE:
Pitfall:
3Dto3D.EXE doesn't preserve quads, it converts all to triangles.
Although DXF2SG3.EXE can convert triangles to quads it can fail
resulting in a corrupted 3D model.
(example: SaturnPlanet in the
demo, see SaturnPlanet2.sg3 resulting from SaturnPlanet2.DXF)
Command line:
3DTO3D.EXE SaturnPlanet.DXF
/dSaturnPlanet2.DXF /if4 /of13
RB_SaturnDXF.EXE:
This tool got a lot of options and
preserves quads. Besides to extract just the geometry (-x), it got an
experimental mode to preserve all other info in the file (like
hierarchy) which just modifies the geometry. It is experimental because
it's not known exactly what DXF features are supported by DXF2SG3.EXE
and 3DEditor. You only need to experiment with this if the standard
option (-x) don't fit your needs.
Command line:
RB_SaturnDXF.EXE SaturnPlanet.DXF
-o SaturnPlanet3.DXF -x
4.
Convert to .SG3 for use in 3DEditor.
Pitfall:
You know the Saturn got a
different coordinate system. Unfortunately this is not fully taken care
of by DXF2SG3.EXE.
With one sided polygons, the model
will look inverted or be totally invisible. You will have to invert
normals (-back) or make dual sided polygons (-dual).
Note:
Possibly the geometry itself is not displayed the same in 3DEditor like
in the 3D modelling tool. The coordinate system conversion could thus
be totally done by applying rotation (-rot x y z) and flip axis
direction with negative scaling (-scl x y z).
DXF2SG3.EXE:
It allowes to invert normals (-back),
convert triangles to quads (-quad), create dual plane polygons (-dual)
and apply object transformations like scale (-scl x y z), rotation
(-rot x y z) and translation (-pos x y z)
Command line:
DXF2SG3.EXE SaturnPlanet3.DXF
-back -scl 10 10 10 -rot 90 0 0
DXF2SG3.EXE SaturnRings3.DXF -back -dual -scl 10 10 10
5.
3DEditor got tools like translate, scale, rotate which are all just
used for further editing and don't effect the 3D model itself.
There is a face select mode to select one or more faces. Faces can be
selected by holding down left mouse button and form a rectangle. The
edit menu supports face selection with "Select clear" and "Select all".
The last tool is used to move and scale the sliced texture onto the
model.
Material properties can be applied to the selected faces with the
material property tool.
(color, texture id, use light, use gouraud, 4 gouraud table color
values, dual or single plane, mesh and other Saturn specfic stuff...)
You might want to apply textures to the model using the "Texture List"
tool. See
How to create
a sprite/texture table
How to span
a texture across
multiple polygons
6.
In 3DEditor, select File -> Save As and save it as .MDL file which
can be included in your C source code.
Expert note:
This obviously makes the 3D model hard coded in your binary executable.
To create a binary 3D model to be loaded from CD, look at the tool
RB_SaturnMAP included in the RB library (C:/SaturnOrbit/RB/SaturnMAP/).
It can convert any number of .MDL files output from 3DEditor to a
binary file.
It's main purpose is to create a 2D space partitioned representation of
the 3D data, like it's used in the "Making a 3D racing game for SEGA
Saturn" project (and similar in SGL examples SHOOTING, BIPLANE, DRIVING
and DRIVING2).
It works by editing a C file to set properties and parameters in which
the .MDL files are inluded. Everything has to be compiled and then
executed to produce the desired output. It's binary and C source output
functions can be used for your purpose.
How
to create a sprite/texture table
We will use 3DEditor's (C:/SaturnOrbit/TOOLS/SSSDK/) tool "Texture
List" to easily generate all the texture table data. For sprites an
additional SPR_ATTR table is needed, which remains to be hand written.
These tables and data are needed for your game to display
sprites/textures on Saturn:
bitmap data:
content: raw pixel data
used for: transfer to VDP1 VRAM
availability: not used after transfer
code:
Uint16
texture_SpriteTable000[] = {
0x0000,0x0000,0x0000,0x0000,0x0000,0x0000,0x0000,0x0000,
0x0000,0x0000,0x9d8f,0x892c,0x892c,0x9d8f,0x0000,0x0000,
...
};
TEXTURE table:
content: width, height, VDP1 VRAM
destination
used for: slInitSystem()
availability: has to be always present for drawing
code:
TEXTURE
tex_SpriteTable[] = {
TEXTBL( 24, 18, CGADDRESS+0),
...
};
PICTURE table:
content: texture id, color mode, bitmap
source
used for: transfer to VDP1 VRAM
availability: not used after transfer
code:
PICTURE
pic_SpriteTable[] = {
PICTBL(  0, COL_32K,
texture_SpriteTable000),
...
};
SPR_ATTR table:
content: sprite drawing attributes
used for: drawing
availability: needed for drawing only
code:
SPR_ATTR attr_SpriteTable[] = {
SPR_ATTRIBUTE(0,No_Palet,No_Gouraud,CL32KRGB|SPenb|ECdis,sprNoflip),
...
};
Workflow:
- prepare images (see How to convert sprites,
textures and animations)
- open 3DEditor and open it's tool
"Texture List"
- load existing .SGT texture table,
if you already had one
- import sprite/texture images
- export (Save as)
1. Ensure all
sprite/texture images meet the restrictions here:
How to convert sprites, textures and
animations
2.
Open 3DEditor (C:/SaturnOrbit/TOOLS/SSSDK/) and select the "Texture
List" tool by clicking "View -> Texture List" or the button left
from the "?" button.
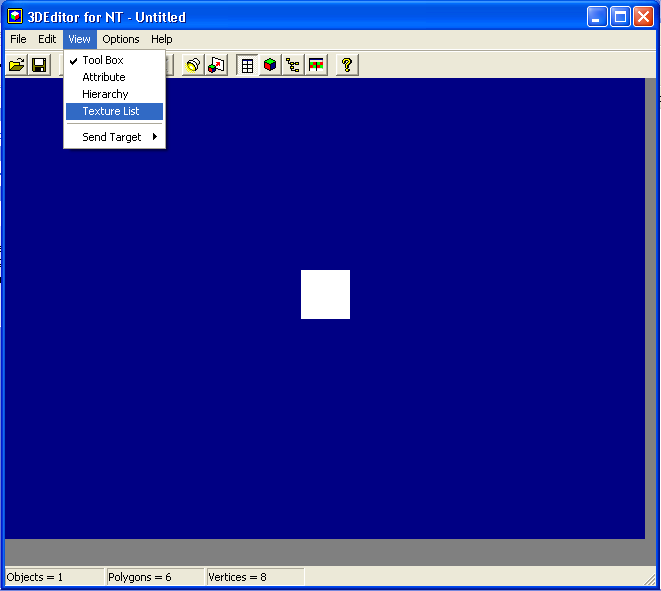
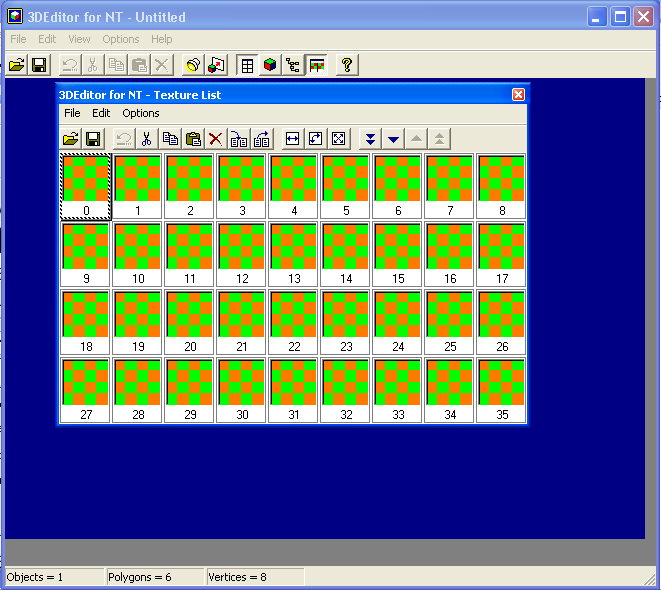
An empty texture list looks like this:
3.
If you have been working on the texture list before, load that .sgt
file by clicking "File -> open".
4.
To import a new sprite/texture select the position where to insert it.
The sprite/texture is identified for drawing on Saturn by it's position
id in the list.
Then select "File -> Import" and select the .bmp or .jpg image you
want to import and press OK.
For importing multiple images at once, hold down SHIFT while selecting
files and then press OK.
You may want to import multiple images for animations in VDP1 VRAM, for
example.
See How to convert
sprites, textures and animations.
Pitfall:
After importing multiple textures
in "Texture List" tool, 3DEditor might not respond like file dialogs
are not opened anymore.
So save the texure list by
pressing on the save button. It will most likely be saved as
Untitled.sgt in the folder last used. After saving, close "Texure List"
and close 3DEditor. Starting 3DEditor again will then work correctly.

The "Texture List" is able to cut and insert sprites/textures into the
list and thus change the order of images, e.g. the id assigned.
Pitfall:
When reordering or deleting
textures in "Texture List" tool, the 3D models that use textures of
this table by id will have wrong textures assigned, since the same id
does not denote the same texture anymore.
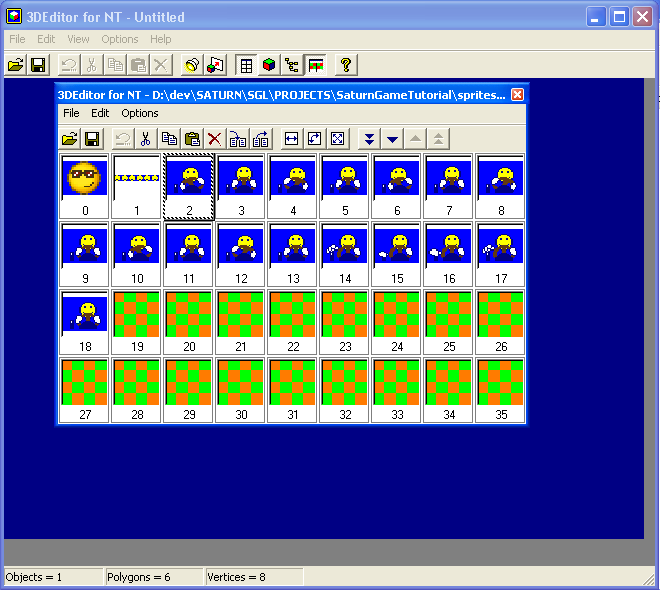
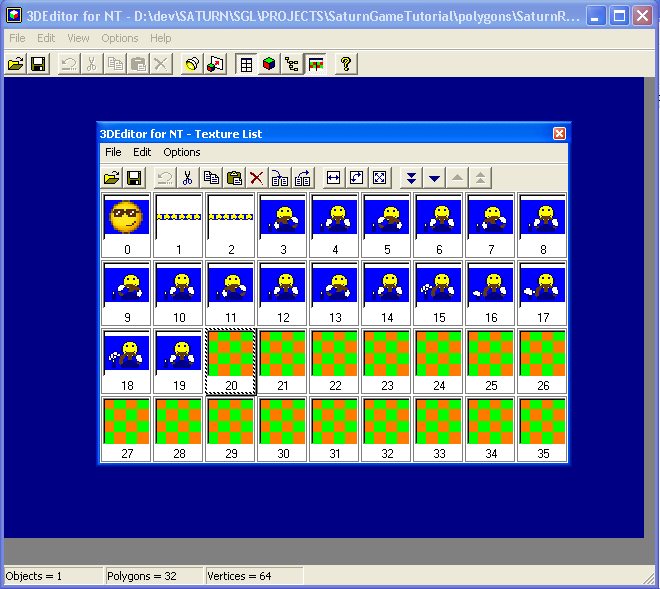
Example: texture list of the demo containing all sprites
(textures will be added later)
5.
If you want to be cool and load the texture table bitmap data from CD,
see How to create a sprite/texture
table
to be loaded from CD (+ compression).
In most cases you want to hardcode the data into your binary executable
by including it in your C code.
Two ways are possible, depending on the number of transparent colors
used (A or B):
A)
If all sprites/textures got the same transparent color:
In "Texture List" select "File -> Save as" one .TXR C source.
Pitfall:
When saving as .TXR file, the
"Texture List" tool will assume that black is the transparent color.
If you got a different transparent
color(or none), you need to correct that with the search and replace
function of a text editor (like Dev-Cpp IDE).
- replace all occurences of 0x0000
by 0x80000 to make black visible
- replace all occurences of
the transparent color by 0x0000.
Example: In the demo it's
blue, all 0xfc00 replaced by 0x0000
Finally hand write the SPR_ATTR table of sprite drawing attributes.
B)
If different sprites/textures got different transparent colors:
Export as multiple C source files:
In "Texture List" select "File -> Export". A window will pop up
asking for an intervall of sprites/textures to export.

Make your choice and press OK.
For saving files specify the filename prefix and select .C file type.
Now you will be asked for every image to specify it's transparent color.
When finished you will have a number of C sourcefiles named:
<filename prefix><number>.c
These files contain only the raw bitmap data.
To get the TEXTURE and PICTURE tables, do like in 5.A):
"File -> Save as" one .TXR file.
Copy and paste the TEXTURE and PICTURE table from the .TXR file into
your sourc code.
For sprites only,
hand write the SPR_ATTR table of sprite drawing attributes
How
to create a sprite/texture
table
to be loaded from CD (+ compression)
This is to transform the bitmap data of the sprite/texture table into
one (compressed) binary file, which can be loaded from CD to lower the
size of the binary executable by up to 0x70000 = 458752 bytes.
It enables the use of multiple sprite/texture tables, too.
We will use BGCON.EXE to create the binary and CMPRUN.EXE to compress
it with RLE compression.
Workflow:
- create texture table
- export all as .bmp files
- batch convert to .TGA file
format with ACDSee
- create uncompressed binary
with BGCON.EXE
- optional: compress binary
(RLE)
1. You'll need to
have a .SGT texture list created, see How to create a
sprite/texture table and follow the steps untill and including 4.
2. Follow the steps
just like 5.B). But instead of
exporting multiple .c files, export multiple .bmp files.
Take care of 8.3 filename format (so specify a short filename prefix,
maybe 5 or 6 characters), this is required for BGCON to import them
later.
Now you should have all sprite/texture table entries as .bmp files.
3. Use a tool of
your choice (like ACDSee)
to batch convert the file format from .bmp to
.tga.
In ACDSee: select
all sprite/texture image files, right click on them
and select "Convert..."
Choose .TGA as output image format:
4. We will use
BGCON.EXE to load all images and append each of them to the binary
file we want to create.
Write a command file for BGCON.EXE to do this:
(Example from SaturnGameTutorial/demo/sprites_textures/SprTbl_CD/)
CD 15
IF TGA
IM BITMAP
CMP NONE
RGBHI ON
TRANS -1
OF BIN
L spr000.tga
S SprTbl.bin
L spr001.tga
S SprTbl.bin
L spr002.tga
S SprTbl.bin
...
L spr309.tga
S SprTbl.bin
DON'T USE COMPRESSION WITH BGCON!
Read and follow this pitfall info about
using BGCON for sprites and about setting the transparent color.
Create the binary by executing BGCON with the command file:
BGCON.EXE TGA2BIN.TXT
5. Optional: run
CMPRUN.EXE to
compress the binary.
On Saturn it can be decompressed with
CMP_DecRunlen(in, &out,
maxoutsize);
In the demo I use CMP_DecRunlenWord(buffer, &out, 0x100000)
to not link unused object code from CMP, since I know it's word unit.
Info:
Why not compressing with BGCON?
First, using DHUFF compression will simply not work. RLE instead does
work, but BGCON will compress each file seperately. This means on
Saturn you would have to decompress every file seperately. This is
inefficient and furthermore impossible, since you don't know the
offsets where the files start in the binary. So instead we compress the
whole binary with CMPRUN.EXE and decompress the whole file on Saturn.
How to
span a texture across
multiple polygons
The Saturn VDP1 sprite GPU does always draw four-sided polygons aka
quads and the texture assigned to a polygon is always applied as a
whole. The VDP1 does not support texture coordinates. This means you
can not map parts of a texture to a polygon in hardware at runtime. The
workaround is to perform the usual texture mapping (orthogonal,
cylindrical, sperical mapping of a texture onto multiple polygons)
before runtime, to create a lot of new smaller rectangular texture
images.
The only tool to do this is the "Slice Texture" tool of the 3DEditor
(C:/SaturnOrbit/TOOLS/SSSDK/) and it's "Texture List" tool.
How it works:
Take a huge texture and project it onto the desired selected area of a
3D model. "Slice" will generate a couple of unique little textures, one
for every
selected polygon.
Workflow:
- prepare texture to slice
- open 3DEditor, load 3D model
- select faces to apply sliced texture
- open "Texture List" and optionally load
.SGT sprite list
- import texture
- select "Show sliced"
- position 3D model and sliced texture
- do slice operation
- save updated .SGT texture list and
updated .SG3 3D model
1.
Make sure the texture image to slice meets restrictions 2-5 of
How to convert sprites, textures and
animations
2.
Start 3DEditor, select "File -> open" and load the .SG3 3D model to
texture.
To create such a 3D model, see:
How to convert 3D data
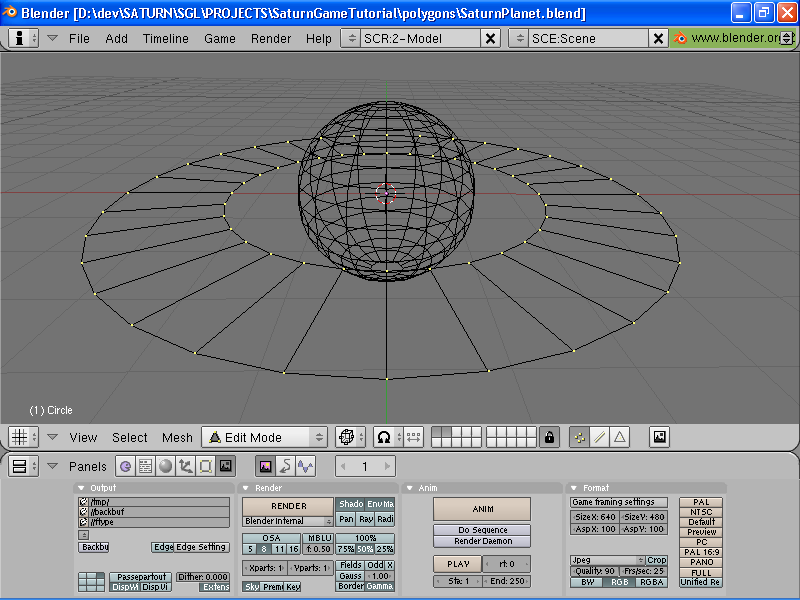
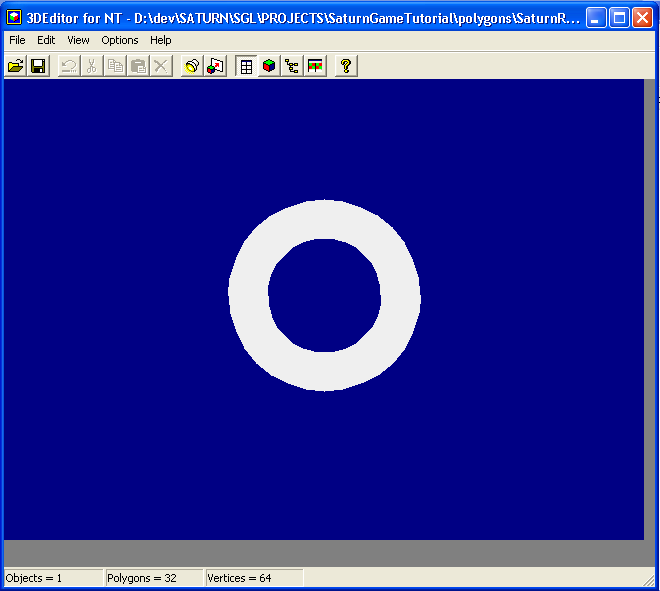
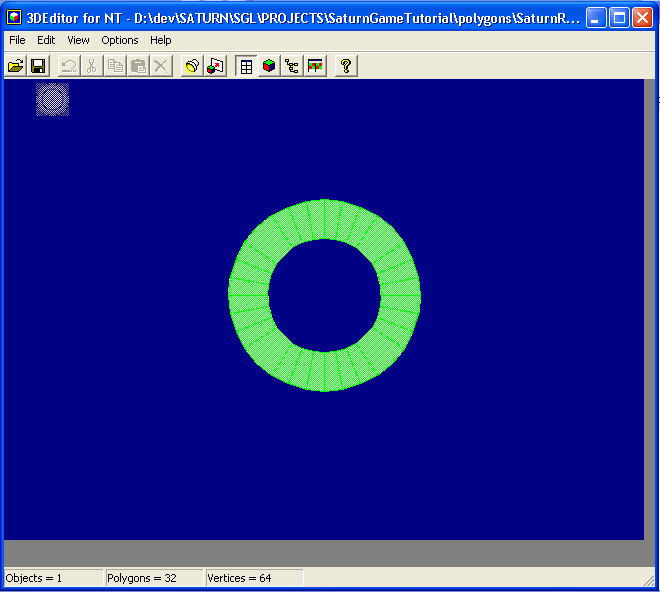
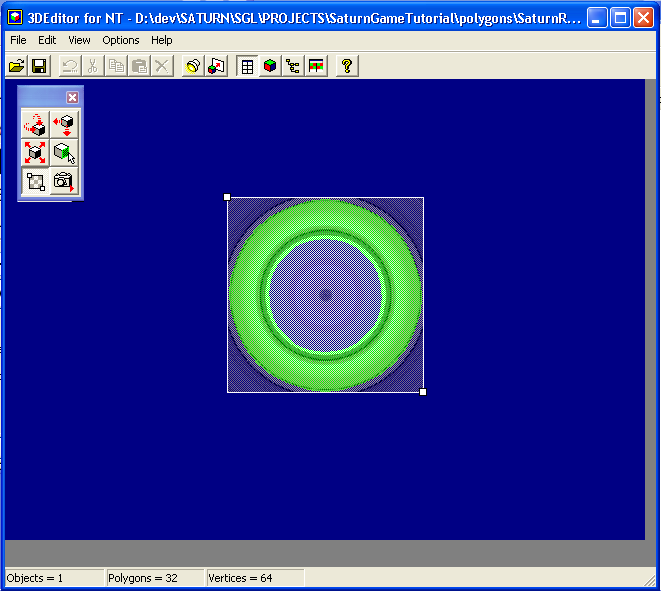
This is the Saturn ring of the demo with 32 polygons:
(SaturnGameTutorial/demo/polygons/SaturnRings3.sg3)
3.
Select the "face select" tool and select all faces on which you want to
map the texure.
4.
Open up the "Texture List" tool by selecting "View -> Texture List"
or pressing the button left from the "?" button.
If you already got a partial texture list: in "Texture List" select
"File -> open" and load the .SGT texture list created before.
You might have started to create the texture list here:
How to create a sprite/texture table
How to span a texture across
multiple polygons
5.
In "Texture List" select the last free
texture list entry. It's important that the entries after the selected
one are all free.
Select "File -> Import" and import the prepared texture to slice.
The imported texture to slice is only used as source for the slice
operation. The content of this texture list entry can (and should) be
cleared after slicing is done.
6.
In "Texture List" select "Options -> Show Sliced". Then close the
"Texture List" to view the 3D model, it's selected faces on which to
map the texture and the texture to slice.
7.
Now use the tools rotate, translate and scale to bring the 3D model in
the desired position. You should have a view on most selected polygons.
Next select "move sliced texture" tool to move and scale the texture to
slice such that it covers the selected faces like you want it to.
8.
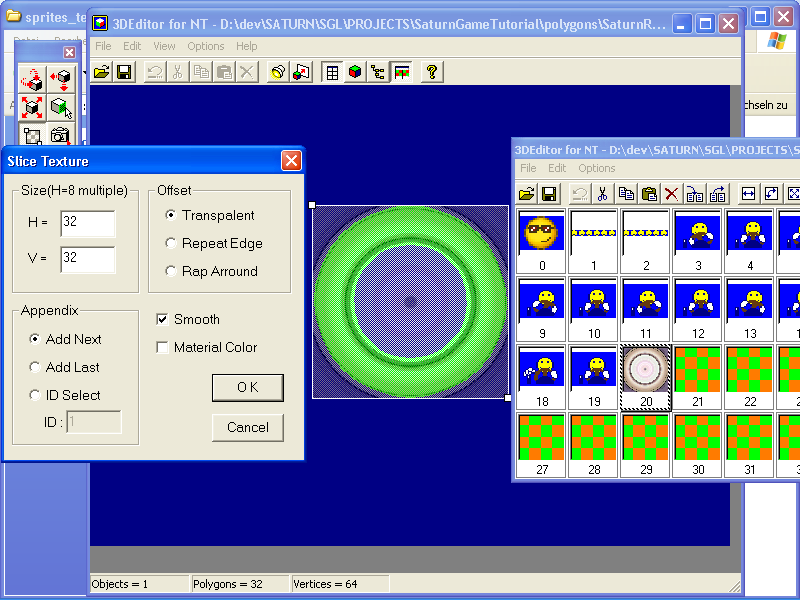
Open up "Texture List" again and select "Options -> Slice".
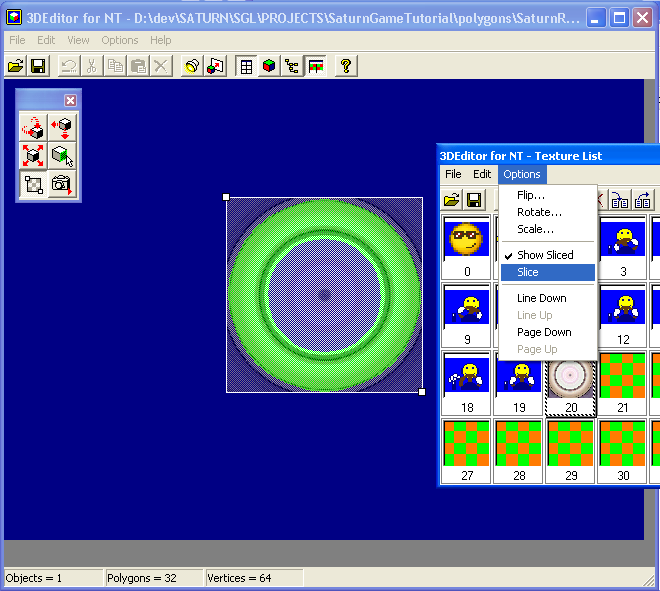
A window will pop up allowing you to specify slice options:
"Offset" - the type of texture mapping
"Transpalent" - orthogonal, just like
you see it
"Repeat Edge" - repeat where texture is too small
"Rap Arround" - wrap texture around (for spheres, ...)
"Size" - width and height of each of the new textures generated through
slicing
Pitfall:
When slicing a texture into a lot
of new textures,
take care to not use to big values
for their width and height.
Example: Saturn planet of the demo
got 256 polygons to texture. Selecting size 32x32 will lead to 256
textures of 32x32 pixels with 2 bytes each = 512 kByte which is more
space than the 448 kByte of available memory in VDP1 VRAM.
"Appendix" - at which texture list entry to start placing the texture
slices in
"Smooth" - smooth resampling
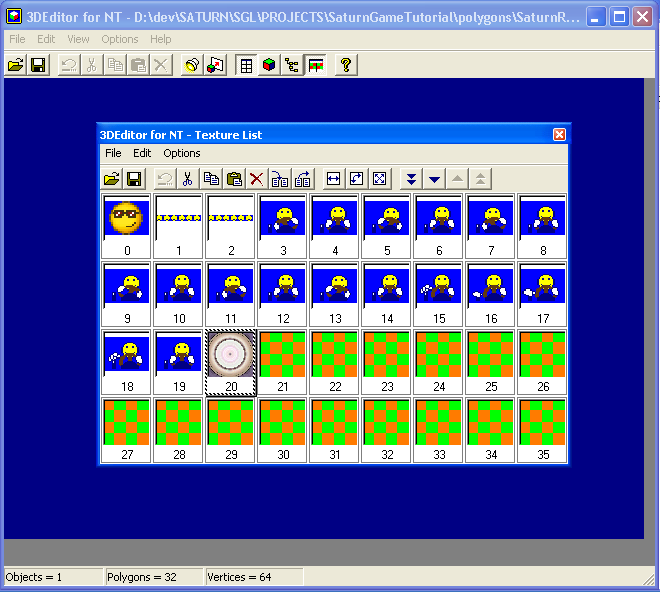
Example: the Saturn ring of the demo:
(orthogonal mapping)
Example: the Saturn planet of the demo:
(Need small size for sliced textures and "Rap Arround")

Hit OK to start slicing.
You will be asked to save the state before slicing, since the operation
can't be "undo"ne.
A lot of new textures are now appended to the texture list.
You should definitely delete the source texture image that's just been
used for slicing by selecting it and press "DEL" key.
Don't use the backspace function of "Texture List", as it will mix
texture assignments, see this pitfall.
The texture is not used anymore, it's big and it will waste too much
memory space in VDP1 RAM.
So you will have an empty hole in the texture list, which on export is
filled with an unused empty texture bitmap of size 8x8.
9.
Save the updated texture list.
Don't forget to save the updated 3D model later, too.
To have a look on how the texured 3D model looks like,
hide the texture to slice by selecting "Options -> Show Sliced"
again,
close "Texture List" and
in 3DEditor deselect all faces by selecting "Edit - > Select Clear".
Example: textured and gouraud shaded Saturn planet from the demo:
(SaturnGameTutorial/demo/polygons/SaturnPlanet3_textured.sg3 +
SaturnGameTutorial/demo/sprites_textures/SpriteTable.sgt)
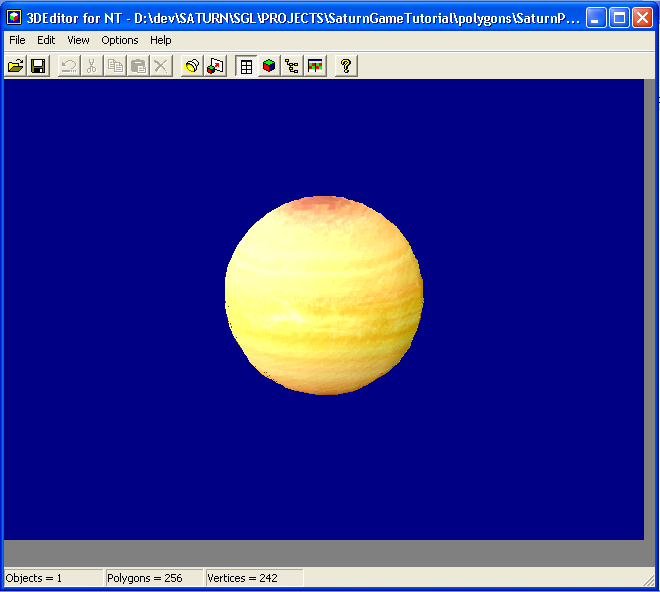
In 3DEditor save the updated textured 3D model.
How to
handle controller input
Controller status is updated every frame by the SGL and written to the
Smpc_Peripheral[] array. There are two controller ports, each usually
having at most 1 peripheral attached. But the Multi Tap allows six
peripherals per port, giving a total maximum of 12 players! So there
are variables containing the number of attached peripherals per port:
Per_Connect1 and Per_Connect2.
This point here covers only the standard joypad inputs like D-PAD,
START, A, B, C, X, Y, Z, L and R trigger, which can be recieved by the
standard control pad, the analog control pad, fighting stick and the
racing wheel. Mouse, analog thumb pad and light gun are not covered.
The SGL also keeps track of buttons being released
(Smpc_Peripheral[index].pull) and pressed
(Smpc_Peripheral[index].push), in addition to the current button status
(Smpc_Peripheral[index].data).
Check for attached
peripherals:
// check if pad is connected
// and return first pad with input
// multi tap compatible, up to 12 pads
//
// return:    -1      - no pad
connected
//            -2
     - no input
//
else    - pad index
Sint8 demo_getFirstPadIndex()
{
Sint8 index;
// is there even a pad connected?
// check number of attached peripherals
if((Per_Connect1 + Per_Connect2) == 0)
return -1;
// check up to 6 pads on left connector
for(index = 0; index < Per_Connect1; index++)
if((Smpc_Peripheral[index].data
!= 0xFFFF) || (Smpc_Peripheral[index].pull != 0xFFFF))
return index;
// check up to 6 pads on right connector
for(index = 0; index < Per_Connect2; index++)
if((Smpc_Peripheral[15+index].data
!= 0xFFFF) || (Smpc_Peripheral[15+index].pull != 0xFFFF))
return index;
// no inputs found!
// that is no error
return -2;
}
Access button status:
Use these macro flags to mask out the correct bits:
start:
PER_DGT_ST
directional pad:
PER_DGT_KU, PER_DGT_KD, PER_DGT_KL, PER_DGT_KR
6 buttons:
PER_DGT_TA, PER_DGT_TB, PER_DGT_TC, PER_DGT_TX, PER_DGT_TY, PER_DGT_TZ
shoulder buttons:
PER_DGT_TL, PER_DGT_TR
Examples:
START button down
if( (Smpc_Peripheral[index].data
& PER_DGT_ST) == 0)
START button pressed this frame
if( (Smpc_Peripheral[index].push
& PER_DGT_ST) == 0)
Standard button combo to leave the Saturn game and launch the
multiplayer:
Uint16 data = Smpc_Peripheral[index].data;
if(((data & PER_DGT_TA) == 0) && ((data & PER_DGT_TB)
== 0) && ((data & PER_DGT_TC) == 0) && ((data &
PER_DGT_ST) == 0))
SYS_Exit(0);
How to use
PCM sound effects
There are 8 PCM channels available, but remember that stereo takes up
two channels per sound. Using high quality sound with 16 bit resolution
and 44.1 kHz samplerate might lower the number of available PCM
channels, too.
(the demo can play up to 4 sounds of 8bit, mono, 8000 kHz)
Initialization:
After slInitSystem(), initialize sound system
#include <sddrvs.dat>
void init_SFX()
{
char sound_map[] = {0xff , 0xff};
slInitSound(sddrvstsk , sizeof(sddrvstsk) , (Uint8 *)sound_map ,
sizeof(sound_map));
}
Include small PCM sounds into your binary (high work RAM):
#include
"soundFX/electronicdoor.c"
and load big PCM sounds from CD into low work RAM:
char *shot = NULL;
Uint32 shot_size = 382464;
PCM shot_dat = {(_Stereo | _PCM16Bit) , 0 , 127 , 0 , 0x0 , 0 , 0
, 0 , 0};
void load_PCM()
{
Sint32 load
=
GFS_Load(GFS_NameToId("SHOT.PCM"), 0, (Uint32 *)0x200000, 0x100000);
if(load <= 0)
slPrint("ERROR
loading file shot.pcm!", slLocate(2, 11));
shot = (char *)0x200000;
shot_size = load;
}
Playback:
Start playback, stop playback and check if still playing with:
// starts playback

// returns

// 0..7
PCM channel on success
// -1 command buffer full
// -2 no channel left
// -3 PCM buffer full
slPCMOn(&shot_dat, shot, shot_size);
// stops playback
// returns:
// TRUE on success
// FALSE command buffer full
slPCMOff(&shot_dat);


// determines if channel is on playback

// 1 if playback

// 0 if not
slPCMStat(&shot_dat);
Expert note:
This method is the most processing power saving method to play PCM.
The downside is that the PCM data needs to be in memory and thus sound
length and quality is restricted by the amount of free work RAM
available.
However, using the PCM library from SBL, you can play back AIFF sound
files, both uncompressed and ADPCM compressed. Playback techniques are:
Memory playback, file playback (only one file access) from CD, or
stream playback from CD (Streaming allowes multiple file accesses
concurrently. So while playing, you can load other data in the
background or play a second file).
But AIFF sound files are not in Saturn hardware format and require CPU
time for conversion. The CPU load with ADPCM encoded files is quite
huge.
For an example on how to use SBL's PCM library together with SGL, look
into Rockin'-B's
Saturn SoundPlayer.
How to use
CD audio
Playback of CD audio music does not consume any processing power on
Saturn!
While CD audio playback is in progress, you can't access the data track
to read files.
(if you do want to access files and play background music
simultaneously, read the expert note in How to use
PCM sound effects)
Initialization:
After slInitSystem(), initialize sound system
#include <sddrvs.dat>
void init_SFX()
{
char sound_map[] = {0xff ,
0xff};
slInitSound(sddrvstsk , sizeof(sddrvstsk) , (Uint8
*)sound_map , sizeof(sound_map));
}
Initialize the CD block by calling one out of those functions with
appropriate parameters:
// most basic CD block
initialization
CDC_CdInit();
// GFS CD file system init
GFS_Init();
// SGL CD file system init
slCdInit();
Enable CD audio:
slCDDAOn(127, 127, 0, 0);
You might also want to check for the track numbers of the first and
last track.
The first track is usually a data track.
Uint32 toc[102];

Uint8 cdtrack;


void getFirstAudioTrack()

{
CDC_TgetToc(toc);
// set track
cdtrack = (toc[99] & 0x00FF0000) >> 16; // first track
number
// avoid setting the data track,
// select first audio instead
if(cdtrack < ((toc[100] & 0x00FF0000) >> 16)) //
last track number
    cdtrack++;

else cdtrack = -1; // no audio tracks
}
Playback:
In the demo to this tutorial, you find some CDDA functions that behave
just like a normal CD player.
The only difference might be, that doing play twice doesn't pause
automatically, since that is not always wanted.
Pitfall:
After your game is initialized and
all needed file data is loaded from CD,
do a CDDA_stop() in order to allow
the CDDA functions to work
void CDDA_pause();
void CDDA_play(Uint8 track);
// stop CD, seek home position
void CDDA_stop();
// start CD scan / fast forward
// or continue playing
void CDDA_fwd();
// start CD scan / fast rewind/reverse
// or continue playing
void CDDA_rvs();
// returning one of the strings below
char *CDDA_getStatusName();
char *CD_status[] = {
"BUSY",
"PAUSE",
"STANDBY",
"PLAY",
"SEEK",
"SCAN",
"OPEN",
"NODISC",
"RETRY",
"ERROR",
"FATAL",
"UNKNOWN"
};
Expert note:
While the copy protection requires the CD to be unlocked (checking the
security ring) in order to access the data track, this is not needed to
play back CD audio tracks.
So in theory, you can use a plain audio CD without data track for
background music in cartridge applications (bootable ROM carts), or in
binaries that are uploaded to Saturn from the CommsLink Cart onto an
Action Replay cartridge.
How to use
text display
The SGL per default uses the normal scroll screen 0 (NBG0) for text
display of strings, fixed point numbers, hex values and matrices.
What's once drawn to this text scroll remains there untill it's
overwritten. The font is equally spaced with each character being 8x8
pixel in size.
If the screen is set to 320x240 pixels, you can display 40x30
characters on screen. A higher screen resolution will display more
characters on screen.
Per default, all other scrolls (sprite scroll, too) are drawn behind
the text scroll, which is transparent.
Drawing is performed to a given character position on screen. The
origin (0,0) is top left corner.
Unfortunately, the NBG0 is the only scroll capable of displaying 16.7
million colors (24 bit color depth) and it's wasted with displaying a
one colored font! There might be the possibility to use another scroll
screen than NBG0 as well as to use a custom sprite based font.
Printing functions:
// string printing to top middle
of screen

slPrint("A string", slLocate(10, 0));
// print a fixed like a float
FIXED fx = toFIXED(1.5685);
slPrintFX(fx, slLocate(10, 1));
// print hexadecimal
Uint32 hex = 0x6ac31;
// no leading zeros
slPrintHex(slLocate(10, 2));
// leading zeros
slDispHex(fx, slLocate(10, 1));
How to use
backgrounds
This covers only simple display of bitmap background images and does
not claim to be complete ;-).
You may want to read How to
convert
background images (+
compression).
Once setup, the background is always displayed. Scrolling and other
manipulations are not covered here.
Initialization:
Setup (normal background NBG1 as) a bitmap scroll of size 512x256 (or
512x512, 1024x256, 1024x512).
Example code based on the demo:
void init_VDP2()

{
slTVOff();


// the address for background color in VRAM is taken from various
examples,
// don't know why
// !!! beware, 1st try the bgcol was the only thing to see on
real Saturn
// what exactly is the back_col_adr? maybe the color at this
adress is
// interpreted as background color and wheereever such color
occurs,
// it's replaced by the given one
// !! all i see is the background color....
slBack1ColSet((void *)BACK_CRAM, CD_Black);
// the debug text lib take the NBG0 scroll <- the only one
with 24bits color depth
// priority = 0 -> scroll not displayed
// take farest away
slPriorityNbg0(7);
slPriorityNbg1(6);
// slPrioritySpr0-7(0);
// we want bitmap scrolls
// only NBG0 and NBG1 can handle bitmap mode
// color modes:
//
palettet:
COL_TYPE_16, COL_TYPE_256, COL_TYPE_2048
//
rgb:
COL_TYPE_32768, COL_TYPE_1M
// bitmap sizes(BM_HxV):    BM_512x256,
BM_512x512, BM_1024x256, BM_1024x512
slBitMapNbg1(COL_TYPE_32768, BM_512x256, (void *)VDP2_VRAM_A0);

// might want to clear it or load an image later
// memset((void *)VDP2_VRAM_A0, CD_Black,
256*512*2);
// monitor position in scroll coordinate space
// sets the position of monitors topleft corner(fixed format)
slScrPosNbg1(toFIXED(0.0), toFIXED(0.0));
// reduction setting: only NGB0 and NBG1 are able to RBG, too)
// modes:   ZOOM_1, ZOOM_HALF,
ZOOM_QUATER      each untill x256
slZoomModeNbg1(ZOOM_1);
// zoom
// fixed point reziprocal of scale ratio in x and y direction
slZoomNbg1(toFIXED(1.0),
toFIXED(1.0));
// registeres scrolls
// call only after all scroll function settings
// returns 0 or -1(ERROR)
slScrAutoDisp(NBG0ON | NBG1ON);


slTVOn();
}
Data transfer:
You see the bitmap scroll is an image of fixed size. So transfering an
image of smaller size to it needs special care (img2VRAM).
- optional: load from CD
- optional: decompress
- transfer
Example code based on the demo:
void loadBG()
{
// load from CD into an allocated
buffer, decompress and
display the
// background image
Sint32 load = GFS_Load(GFS_NameToId("LAVA.BIN"), 0, (Uint32
*)buffer,
120260);
if(load <= 0)
display_Error("ERROR loading file
LAVA.BIN!", 1);
if(DeHuff(buffer, (void *)adr) != 0)
display_Error("ERROR
decompressing file LAVA.BIN!", 1);
img2VRAM((Uint16 *)VDP2_VRAM_A0, 512, (Uint16 *)(0x200000), 240,
320);
}
// line-by-line transfer to vram
void img2VRAM(Uint16 *vram, Uint16 vram_width, Uint16 *img,
Uint16 img_height, Uint16 img_width)
{
int i;
Uint32 oVRAM = 0;
Uint32 oIMG = 0;
for(i = 0; i < img_height; i++) {
memcpy((void *)(vram + oVRAM),
(void *)(img + oIMG), img_width*sizeof(Uint16));
oVRAM += vram_width;
oIMG += img_width;
}
}
Expert note:
Transfering bitmap data to VDP2 VRAM with img2VRAM is inefficient.
For normal Saturn programs this is OK, since img2VRAM is only used at
game start.
However for apps that transfer images to VDP2 VRAM very heavily, like
emulators, software renderers, video decompression, it can slow
performance very much.
Fortunately there is the possibility to transfer the whole image to
VRAM with DMA by using the linescroll feature of the VDP2. But there is
only one very specific example by CyberWarriorX (see SaturnOrbit) which
is in fact just the example code found in the linescroll technical
bulletin board. The computation of the linescroll table and vertical
cell scroll table is the difficulty that has not been solved yet.
How to use sprites
You will need a sprite table(raw bitmap data and TEXTURE, PICTURE and
SPR_ATTR tables) included in your sourcecode:
How to create a sprite/texture table
Initialization:
Specify the TEXTURE table as second parameter in slInitSystem():
slInitSystem(TV_320x240,
tex_SpriteTable, 1);
After that copy the sprite/texture bitmap data to VDP1 VRAM by calling
set_sprite with parameters PICTURE table, number of picture table
entries and TEXTURE table.
set_sprite(pic_SpriteTable, 310,
tex_SpriteTable);
For each sprite/texture it determines correct copy size by the width,
height (from TEXTURE) and color mode (from PICTURE) and copies the
bitmap data (from PICTURE) to the desired location in VDP1 VRAM (from
TEXTURE).
Expert note:
Usually the generated sprite/texture bitmap data is located
consecutively in VDP1 VRAM, enabling to load in from CD and copy it to
VRAM in a batch. See:
How to create a sprite/texture table
to be loaded from CD (+ compression)
For such a binary sprite table you would do:
// load from CD, decompress and
set transparent color of the
// work RAM sprite animation
Sint32 load = GFS_Load(GFS_NameToId("SPRTBL.BIN"), 0, (Uint32
*)buffer, 120260);
if(load <= 0)
display_Error("ERROR loading file
SPRTBL.BIN!", 1);
// I know it's word unit
void *out = (void *)0x200000;
if(CMP_DecRunlenWord(buffer, &out, 0x100000) != CMP_DEC_OK)
display_Error("ERROR
decompressing file SPRTBL.BIN!", 1);
set_colorkey((Uint16 *)adr, 244768/2, CD_Blue, 0);
// this assumes consecutive character pattern order in VRAM
// like 3DEditor usually generates it by default
slDMACopy((void *)0x200000, (void
*)(SpriteVRAM + CGADDRESS), (Uint32)244768);
Drawing sprites:
Sprites must be redrawn every frame. Advance to next frame by calling
slSynch();
Drawing order is determined by the z depth value which effects sprites
and polygons the same way.
Pitfall:
Set the z depth value big enough
or it won't be visible on screen (same with too big z depth values). A
z depth value of 169.0 is good.
// display attributes of all used
sprites in VDP1 VRAM

// have this global in your program

// see How to create a sprite/texture
table

SPR_ATTR attr_SpriteTable[] = {
SPR_ATTRIBUTE(0,No_Palet,No_Gouraud,CL32KRGB|SPenb|ECdis,sprNoflip),
....
}
void drawSprite()

{
// display position: screen
middle, scale is 1.0, depth is
169 such that it is located in the drawable view volume.
FIXED pos[XYZS] = {toFIXED(0.0), toFIXED(0.0),
toFIXED(169),
toFIXED(1.0)};
ANGLE ang = DEGtoANG(0.0);
Uint32 spriteID = 0;
// just a list of display function, use onle one ;)
// display using screen coordinates
    // for negative scaling the display
scale is
computed from z pos * (-scale)
slDispSprite(pos, attr_SpriteTable + spriteID, ang);
    // 4 points in
screen
coordinates
slDispSprite4P(FIXED pos[4][XY], FIXED zpos, SPR_ATTR *atrb);
    // horizontal and vertical
scaling,
allowing negative values
slDispSpriteHV(FIXED pos[XYZSS],
SPR_ATTR *atrb, ANGLE Zrot);
// similar to above
slDispSpriteSZ(FIXED
pos[XYZSS],
SPR_ATTR *atrb, ANGLE Zrot);
// display with the current matrix perspective
transformations
// just like when drawing polygons
slPutSprite(pos, attr_SpriteTable + spriteID, ang);
slSynch();
}
How to
use animated sprites (+ short and long)
This extends How to use
sprites.
You might also want to read How to convert
sprites, textures and animations and How
to create
a sprite/texture table.
Sprite bitmap data is located in VDP1 VRAM and referenced by a sprite
id number which is used to access the TEXTURE table.
Now there are two attempts possible to display animated sprites:
Animations (short) in
VDP1 VRAM:
How it works on Saturn:
Change the sprite/texture id for a sprite to change it's animation
frame displayed.
Different sizes of the animation frames are allowed.
Animations (long) in
work RAM:
How it works on Saturn:
Overwrite the sprite/texture bitmap data in VDP1 VRAM with data stored
in work RAM.
All frames of the animation are assumed to have equal size.
This is special:
For each animation of this kind you will need a dummy frame entry in
the texture table where the bitmap data is transfered to.
Example:
You have 10 work RAM animations in
total. They got 5 different pixel sizes. For 2 sizes it can happen that
multiple (let's say a maximum is 3 and 2) animations are displayed at
once, which are supposed to be out of synch. Some other sizes are
displayed at once, too, but they are in synch, e.g. always show equal
frames.
->
You will need to have 5 dummy frames, one for each size. Plus
additional (2 and 1) dummy frames for each out of synch animation
duplicate that can be displayed at once.
Initialization:
In addition to those in How
to use
sprites,
for animations in work RAM only:
- optional: load the animation from CD.
- optional: must be decompressed.
- optional: set the transparent color. Must be done on Saturn for
DHUFF compression, but for RLE compression and no compression it is
possible to do that on PC with a hex editor.
Example from demo:
Uint8 *adr = (Uint8 *)0x200000;
Sint32 load;
// load from CD, decompress and set transparent color of the
// work RAM sprite animation
load = GFS_Load(GFS_NameToId("NEWBIE.BIN"), 0, (Uint32 *)buffer,
120260);
if(load <= 0)
display_Error("ERROR loading file
NEWBIE.BIN!", 1);
if(DeHuff(buffer, (void *)adr) != 0)
display_Error("ERROR
decompressing file NEWBIE.BIN!", 1);
set_colorkey((Uint16 *)adr, 570960/2, CD_Blue, 0);
Implementation:
Example code based on the demo,
capable to draw all 3 types: normal sprites, VRAM animations and work
RAM animations:
typedef enum {
SPR_TYPE_SINGLE,
SPR_TYPE_ANI_WRAM,
SPR_TYPE_ANI_VRAM
} SpriteType;


typedef struct SPRITE {
SpriteType type;
char *name;
FIXED pos[XYZS];
ANGLE ang;
Uint32 spriteID;
// for animations
Uint32 frame, nFrames;
Uint8 *source, *target;
Uint32 size;
struct {
Uint8 count, max;
} frameskip;
} Sprite;


Sprite sprites[5] = {
{SPR_TYPE_SINGLE, "cool",
{toFIXED(0.0), toFIXED(-60.0), toFIXED(169), toFIXED(1.0)},
DEGtoANG(0.0), 0, 0, 0, NULL, NULL, 0, {0, 0}},
{SPR_TYPE_ANI_WRAM, "newbie 1 work RAM", {toFIXED(-80.0),
toFIXED(60.0), toFIXED(169), toFIXED(1.0)}, DEGtoANG(0.0), 1, 0, 183,
(Uint8 *)0x200000, (Uint8 *)(SpriteVRAM + CGADDRESS+864),
104*15*sizeof(Uint16), {0, 10}},
{SPR_TYPE_ANI_WRAM, "newbie 2 work RAM", {toFIXED(80.0),
toFIXED(60.0), toFIXED(169), toFIXED(1.0)}, DEGtoANG(0.0), 2, 6, 183,
(Uint8 *)0x200000, (Uint8 *)(SpriteVRAM + CGADDRESS+3984),
104*15*sizeof(Uint16), {0, 10}},
{SPR_TYPE_ANI_VRAM, "driving 1 video RAM", {toFIXED(-80.0),
toFIXED(-60.0), toFIXED(169), toFIXED(1.0)}, DEGtoANG(0.0), 3, 0, 17,
NULL, NULL, 0, {0, 20}},
{SPR_TYPE_ANI_VRAM, "driving 2 video RAM", {toFIXED(80.0),
toFIXED(-60.0), toFIXED(169), toFIXED(1.0)}, DEGtoANG(0.0), 3, 3, 17,
NULL, NULL, 0, {0, 20}},
};


void drawSprite(Sprite *sprite)

{
// animate
if(sprite->type != SPR_TYPE_SINGLE) {
if(++sprite->frameskip.count
>= sprite->frameskip.max) {
sprite->frameskip.count = 0;
// a new frame
if(++sprite->frame >= sprite->nFrames)
sprite->frame =
0;
}
if(sprite->type == SPR_TYPE_ANI_WRAM)
slDMACopy((void
*)(sprite->source + sprite->frame*sprite->size), (void
*)sprite->target, sprite->size);
}
if(sprite->type ==
SPR_TYPE_ANI_VRAM)
slDispSprite(sprite->pos,
attr_SpriteTable + sprite->spriteID + sprite->frame,
sprite->ang);
else
slDispSprite(sprite->pos,
attr_SpriteTable + sprite->spriteID, sprite->ang);
}


void drawSprites()

{
int i;
for(i = 0;i < 5; i++)
drawSprite(sprites + i);
slSynch();
}
How to
use (textured) polygons
Data needed:
Include the polygon data in your source code, see How to convert
3D data.
#include
"polygons/SaturnRings3_textured.mdl"
It contains this data:
POINT    point_0[]
= {
POStoFIXED(
20.5185,-13.7100,  0.0000),
...
};
POLYGON polygon_0[] = {
NORMAL(  0.0000,
0.0000,  1.0000), VERTICES( 1, 0, 3, 2),
...
};
ATTR attribute_0[] = {
ATTRIBUTE(Dual_Plane, SORT_CEN,
21, C_RGB(20,20,20), No_Gouraud, CL32KRGB|MESHoff, sprNoflip, UseLight),
...
};
XPDATA xpdata_0[] = {
point_0,
sizeof(point_0)/sizeof(POINT),
polygon_0, sizeof(polygon_0)/sizeof(POLYGON),
attribute_0,
NULL,
};
Initialization:
Using sprites/textures:
(you need a texture table, see
How to create
a sprite/texture table)
// init SGL with specifying the TEXTURE table
slInitSystem(TV_320x240, tex_SpriteTable, 1);


// and transfer sprite/texture bitmap data to VDP1 VRAM

// specify TEXTURE and PICTURE table and length of PICTURE table

set_sprite(pic_SpriteTable, 310, tex_SpriteTable);
Not using any sprites/textures:
// you need to specify NULL as
TEXTURE table.
slInitSystem(TV_320x240, NULL, 1);
Drawing:
Pitfall:
Never ever forget the braces () after slUnitMatrix(); slPushMatrix();,
slPushUnitMatrix(); or slPopMatrix();.
This will corrupt polygon display
and the bug is very hard to find!
No hierarchy:
// init current matrix
slUnitMatrix(CURRENT);
// object transformation
slTranslate(pos[X], pos[Y], pos[Z]);
slScale(sca[X], sca[Y], sca[Z]);
slRotX(ang[X]);
slRotY(ang[Y]);
slRotZ(ang[Z]);
// display Saturn rings
slPutPolygon((PDATA *)&xpdata_SaturnRings);


// change frame

// essencial for all in SGL

slSynch();
With hierarchy (matrix stack):
// init current matrix
slPushUnitMatrix();

{
// object transformation
slTranslate(pos[X], pos[Y], pos[Z]);
slScale(sca[X], sca[Y], sca[Z]);
slRotX(ang[X]);
slRotY(ang[Y]);
slRotZ(ang[Z]);
// display Saturn rings
slPutPolygon((PDATA *)&xpdata_SaturnRings);
// display other stuff

// Example: a big rock in the Saturn Ring

slPushMatrix();

{
.......
}

slPopMatrix();
}

slPopMatrix();
// change frame

// essencial for all in SGL

slSynch();
Let the slave CPU do most drawing work:
slPutPolygonS((PDATA
*)&xpdata_SaturnRings);
// change frame

// essencial for all in SGL

slSynch();
How
to use realtime gouraud shading
This is in addition to (and requires the steps in) How to use (textured)
polygons.
Gouraud shading does interpolate color values of the (Saturn: 4)
vertices all over the whole polygon face. On Saturn these color values
are stored in a gouraud color table in VDP1 VRAM. This table can be
precomputed or edited by hand in 3DEditor
(C:/SaturnOrbit/TOOLS/SSSDK/). And this table can be computed in
realtime on Saturn, by evaluating the light intensity at the vertices
which is caused by a light source direction vector.
Okay, you can compute a light direction vector for each realtime
gouraud shaded polygon object you are drawing.
Realtime gouraud computation will increase the CPU load on Saturn.
Data needed:
3D model attributes:
specify CL_Gouraud, UseGouraud and the gouraud table position GRreal(0)
like here:
(done automatically by 3DEditor in exported .MDL files)
ATTR
attribute_0[] = {
ATTRIBUTE(Single_Plane, SORT_CEN,
54, C_RGB(20,20,20), GRreal(0), CL32KRGB|MESHoff|CL_Gouraud,sprNoflip,
UseGouraud),
...
};
Work variables:
// !!!!! VERY IMPORTANT
// don't take different gouraud table addresses
// in the .mdl files and here
#define GRaddr 0x1c38 //0xe000
// SGL300PV.TXT: suppose it's maximum sized gouraud table in use
// but in the end, there seems to be only one gouraud table for
all objects
#define GOUR_REAL_MAX 256
// work area for realtime gouraud table computation
GOURAUDTBL
gourRealMax[GOUR_REAL_MAX];
Uint8
vwork[GOUR_REAL_MAX];
Initialization:
You don't need to transfer the gouraud table at startup, since it's
recomputed every frame.
// the real time gouraud function
is
// only documented in japanese language(only little in english)...
// instead of copying the global gouraud table to VRAM
// only once at startup
// slPutPolygonX() computes a new one
// for every XPDATA object every frame
// and copies the table to VRAM with slGouraudTblCopy()
// For this, a local temporary gouraud table is needed
// which is big enough to hold the biggest gouraud table in use
slInitGouraud(gourRealMax, GOUR_REAL_MAX, GRaddr, vwork);
slIntFunction(slGouraudTblCopy);
Drawing:
// light source variables

FIXED light[XYZ];

ANGLE light_ang[XYZ] = { DEGtoANG(0), DEGtoANG(0), DEGtoANG(0)};

ANGLE light_angAdd[XYZ] = { DEGtoANG(1.0), DEGtoANG(0.5), DEGtoANG(0)};


void draw()
{
slUnitMatrix();
// object transformations
// ...
computeLight();
slPutPolygonX((XPDATA *)&xpdata_SaturnPlanet, light);
}
// compute moving light direction vector
void computeLight()
{
FIXED light_init[XYZ] = {
toFIXED(0.57735026), toFIXED(0.57735026), toFIXED(0.57735026) };
// never forget the braces () !!!!
slPushUnitMatrix();
{
// perform rotation
slRotX(light_ang[X]);
slRotY(light_ang[Y]);
slRotZ(light_ang[Z]);
// transform light vector
slCalcVector(light_init, light);
}
slPopMatrix();
// advance light rotation
// !!! NO OVERFLOW CHECKING !!!
light_ang[X] += light_angAdd[X];
light_ang[Y] += light_angAdd[Y];
light_ang[Z] += light_angAdd[Z];
}
How to
create an ISO
SaturnOrbit
does create an ISO automatically after compiling.
You only need a folder named "cd" which is the root of the CD to create
and which contains all files but the binary executable.
The Saturn game CD should contain files ABS.TXT, BIB.TXT and CPY.TXT.
Also an IP.BIN is needed for ISO creation. SaturnOrbit
uses a default IP.BIN, but you can create on your own.
For ISO creation the tool mkisofs.exe is used (the former buildcd.exe +
stripiso.exe approach dosn't work anymore on Windows XP).
ISO creation commandline is:
mkisofs.exe -quiet -sysid "SEGA
SATURN" -volid "SaturnApp" -volset "SaturnApp" -publisher "SEGA
ENTERPRISES, LTD." -preparer "SEGA ENTERPRISES, LTD." -appid
"SaturnApp" - abstract "ABS.TXT" -copyright "CPY.TXT" -biblio "BIB.TXT"
-generic-boot IP.BIN -full-iso9660-filenames -o sl.iso cd
How to
burn a CD with audio tracks
Originally a SEGA Saturn CD always consists of a data track (mode 1,
2048 sector size) and at least one audio track. If the game doesn't use
CDDA, then this track just says "This disc is a SEGA Saturn game
CD....." to avoid people from playing the data track in their stereo.
So you need an ISO file of the data track and a number of audio tracks
in WAV or MP3 format (or BINARY = headerless WAV). Then a CUE sheet has
to be written which
determines the disc and track layout.
Making a CUE sheet:
Use the tool SegaCueMaker.exe (C:/SaturnOrbit/TOOLS/) to generate a CUE
sheet. Run it in the same directory where the ISO file and the WAV
files are.
Yes, SegaCueMaker won't recognize MP3 files, although they are
supported by most burning proggies which burn CUE sheet CDs.
Workaround: Just like in the Saturn demo, rename all .mp3 files to
.wav, run SegaCueMaker, rename them to .mp3 again and open the
generated CUE sheet in a text editor. Replace all occurences of WAVE
with MP3 and file extensions .wav to .mp3, too.
Example: CUE sheet of the demo
FILE "sl_coff.iso" BINARY
TRACK 01 MODE1/2048
INDEX 01 00:00:00
POSTGAP 00:02:00
FILE "denied.mp3" MP3
TRACK 02 AUDIO
PREGAP 00:02:00
INDEX 01 00:00:00
FILE "freeze.mp3" MP3
TRACK 03 AUDIO
INDEX 01 00:00:00
FILE "outback.mp3" MP3
TRACK 04 AUDIO
INDEX 01 00:00:00
FILE "scream.mp3" MP3
TRACK 05 AUDIO
INDEX 01 00:00:00
Burning a CUE sheet:
Those CD burning software is known to support CUE sheets:
Nero Burning ROM
Alcohol 120%
Fireburner
CDRWin
Advanced note:
If you need to burn a lot of CD-R's for testing on Saturn, try burning
on quality CD-RW's and apply the CD-RW mod to your saturn. It works! I
tried it years before with older CD-RW's and it didn't work, so use
good ones.
How to
perform the swap trick (once
and twice)
Saturn CD boot sequence:
(with laser pickup position)
- reads table of content (data and audio track layout) (pickup
inside)
- checks outer security ring (pickup outside)
- loads and executes IP.BIN and binary executable (pickup inside)
Perform "swap twice" for all commercial games and homebrew games that
use CD audio tracks. For homebrew games which not use CD audio it's
sufficient and faster to "swap once"
Preparation:
The SEGA Saturn system regognizes when the CD door is opened and exits
the game. To avoid this:
You have to remove the top half of the Saturn case to access the CD
door switch.
Then tape the door switch one the left back side of the CD drive. Test
if the switch is closed by inserting an original CD and turning on the
Saturn system.
If you want to, you can close the Saturn case again.
swap twice (if CD audio
is used)
With the taped CD door switch and Saturn powered off:
- insert CD-R
- power on Saturn
- wait for the CD pickup to move outside and remove the CD-R
- within 3-5 seconds insert an original game CD
- wait for the pickup to return from the outer security ring and
remove original game CD
- faaastly insert the CD-R
swap once (if NO CD
audio is used)
With the taped CD door switch and Saturn powered off:
- insert original game CD
- power on Saturn
- wait for the pickup to return from the outer security ring and
remove original game CD
- faaastly insert the CD-R
Note: If the CD drive got problems to focus the laser on the swapped
CD, you can stop the CD and let it spin again. It works most times.
How to
run a binary in an emulator
Satourne, Saturnin:
Start the emulation by pressing RUN/Start,
wait untill the first polygons of the boot sequence appear,
then pause the emulation and load up a binary to address 0x6004000 and
proceed emulation.
GiriGiri V6a:
Don't wait untill first polygons appear, but untill message "???
passed" (can't exactly remember) appears.
Hacked GiriGiri (commercial):
There is also a way to start homebrew CD images and even binaries with
this emu. Not covered here.
Advanced note:
Saturnin may perform binary loading from the command line in the future.
How to run
an ISO in an emulator
without burning a CD
Using daemon
tools to emulate a CD drive should work with all Saturn
emulators.
Pitfall:
In daemon tools mounting a CUE
sheet CD image with MP3 audio tracks won't work, since deamon tools
hasn't got an MP3 coded.
Convert the MP3 to WAV with the
tool of your choice and recreate or edit the CUE sheet such that all
occurences of MP3 are replaced by WAVE and .mp3 replaced with .wav.
- download daemon
tools
- install
- mount your cd image (whatever format it is, but CUE sheets should
avoid MP3 and use WAV instead to work)
- start emu and make it use the new virtual CD drive you created
How to
upload a binary executable to the Saturn
There are Saturn cartridges with a PC connector like GameShark, EMS
4in1 PLUS, Pro Action Replay, ... .
To connect these to the PC you need an appropriate parallel port cable,
and a cart to plug into your PC.
The original cart is called Comms Link cart, sometimes also Commlink
cart or PC link. It is the fastest option, but the cart needs an ISA
slot in your PC motherboard. None of todays PCs got an ISA slot
anymore, you would need an older PC. The fastest ISA slot PCs got a
INTEL Pentium 3, AMD Athlon slot A or AMD K6-2 socket 7.
For PCs without ISA slot, you'll have to build you a FreeWing IF or
yano/exstand cart.
But these are slower as the original CommsLink cart.
The official Action Replay tools for PC don't support this, but there
is a solution(see SaturnOrbit
readme).
On Windows XP the Saturn interace doesn't initially work, untill
directio is installed (see SaturnOrbit
readme).
To upload and execute a binary on Saturn, use one of the tools found in
C:/SaturnOrbit/TOOLS/PAR/ ????
!!!! this is all unfinished!!!
saturn sh2 debugger, saturn 68k debugger?
How to
test games which require CD
access efficiently on real Saturn
hardware
Instead of burning your homebrew Saturn game CD again and again in
order to test it on real hardware, you could burn it once and upload
the updated binary executable to Saturn each time you want to test it.
- So burn your CD image,
- insert the CD-R/CD-RW into your Saturn CD drive
- insert a call of CdUnlock() to the start of your sourcecode
before doing any CD (file system) stuff,
- upload the binary to the Saturn, see How to upload a binary
executable to the Saturn and
- if you haven't got a modchip, perform the swap trick when the
Saturn CD drive tries to read the outer security ring, see How to perform the swap trick (once
and twice)
- test your app on Saturn, apply sourcode changes, recompile and
proceed at step 4
Unlocking the CD:
As you have booted the Saturn from cartridge, the CD block has not
authenticated/unlocked the data track.
But you can't access the CD (except CDDA, maybe) as long is it's locked.
You can request authentification manually at startup of your game,
before accessing or initializing any CD file system stuff, by calling
CdUnlock().
Pitfall:
just like when starting
the Saturn with a CD-R you will have to perform the swap trick here,
unless your Saturn got a modchip.
/* for initializing the CD-ROM
when testing with PAR */
// taken from somewhere ???
#define SYS_CDINIT1(i) \
((**(void(**)(int))0x60002dc)(i))
#define SYS_CDINIT2() \
((**(void(**)(void))0x600029c)())
int CdUnlock (void)
{
Sint32 ret;
CdcStat stat;
volatile int delay;
SYS_CDINIT1(3);
SYS_CDINIT2();
do {
for(delay = 100000; delay;
delay--);
ret = CDC_GetCurStat(&stat);
} while ((ret != 0) || (CDC_STAT_STATUS(&stat) == 0xff));
return (int) CDC_STAT_STATUS(&stat);
}